Food with kids – growing cress then making sandwiches

Image

Image

I know a lot of you may have done this already with your kids, but I thought it was worth a blog anyway!  I think the experience of growing cress and then making sandwiches was the first time my son Freddy worked out that some food grows and then becomes lunch.  We bought a nice little cress growing kit (that kids can decorate) from Homebase for £2.99:

(http://www.homebase.co.uk/webapp/wcs/stores/servlet/ProductDisplay?langId=110&storeId=10151&partNumber=056871). 

Image

We planted the seeds together, put the kit on the windowsill and watched the cress grow over a few days as we watered it.  He then helped me chop up the cress (child scissors may be best for this), add it to some egg mayonnaise, and make sandwiches.  Freddy was quite proud of himself and still remembers it!  I took photos of the whole thing so we could talk about it afterwards.

Image

Image

The end result!

Thai fish curry and easy mango ice cream (serves 4)

This meal will impress, but takes little effort.  The thai fish curry is basically a case of putting (quite a lot of) ingredients in a blender and wizzing them up to make a sauce, then cooking the vegetables and fish in it.  You could use any fish, but I used haddock.  You can taste the lovely thai flavours in the moderately spicy sauce.  The creamy, delicate, refreshing ice cream/sorbet (a cross between the two) involves putting everything in to a blender and then in a tub to freeze.  It’s the first time I’ve made ice cream and it was so simple!  I think it would have been even better served with some sliced mango and a couple of mint leaves on top, or perhaps some flaked coconut.  Make sure you stir the coconut milk before you add it as it tends to seperate in the can.  A link to the delectable looking thai cooking website that the recipes are from is at the end of this blog.   This meal is best accompanied by an icy beer.

Image

Thai fish curry (15 mins prep/20 mins cooking)

Curry sauce

Large handful of coriander, chopped

1 can coconut milk

2 red onions, chopped

1 thumb-size piece ginger, grated

3 cloves garlic

2 tbsp fish sauce (available in Supermarkets)

1 tsp hot chilli powder

2 tsp ground cumin

2 tsp ground coriander

2 tsp brown sugar (or more to taste)

1/2 tsp turmeric

1 small red chilli

Curry ingredients

3-4 fillets of fresh or frozen fish, any kind but haddock works well

8 mushrooms, chopped

1 red pepper, finely chopped

1 medium tomato, finely chopped

Handful of fresh coriander

Juice of 1 lime

Optional (but advised!): 2-3 kaffir lime leaves, left whole (available in Supermarkets)

Rice, any kind

Place all ‘thai curry sauce’ ingredients in a food processor or blender. Process well to form a smooth curry sauce.  Pour the sauce into a wok (or large frying pan) and place over a medium to high heat. If you have kaffir lime leaves, add them too. Bring to the boil.  Add the fish, mushrooms, and red pepper. Stir well. Reduce heat to medium-high, or until it is simmering nicely. Cook 6-8 minutes.

Add the tomatoes and gently stir in. Continue simmering for another 2-3 minutes.  Do a taste test for salt and sweetness, adding more fish sauce (instead of salt) until salty enough. If too sour for your taste, add a little more sugar.

Serve on top of the rice and sprinkle fresh coriander on top.

Image

Easy mango ice cream (15 mins prep plus 8 + hours freezing)

2 fresh ripe mangos

90 grams of caster sugar

3 tbsp coconut milk

1 tsp lemon juice

1 small container whipping cream (about 1 cup)

Slice the mangos open and scoop out all of the fruit from the skins, including the fruit around the stone.  Place the fruit in a food processor or blender. Add the sugar and blitz for 1 minute, or until the sugar has dissolved and you are left with a delicious mango puree.  Add the coconut milk and lemon juice, and briefly blitz to combine for a few seconds.

Pour the mango puree into a bowl or container while you continue to use your processor/blender. Now pour the whipping cream into the processor/blender. Blitz until the cream forms stiff peaks, or is quite stiff (not runny) when dipped into with your finger.  Add the mango puree to the whipped cream and blitz 5-10 seconds, or until you get a good mango-cream consistency.

Pour into a large tub and place in the freezer. Allow to freeze at least 6 hours, preferably 8.  Serve the mango ice cream in bowls, or scoop into ice cream cones for kids. To make scooping easier, take the sorbet out of the freezer at least 20 minutes ahead of time.  Top with sliced mango and mint or flaked coconut if you wish!

Both recipes are from this great website:

http://thaifood.about.com/

Chocolate brazil nut cookies (15 mins prep/15 mins cooking)

Image

These cookies were recommended by my friend Melissa.  She says ‘I’ve tried this fail proof recipe loads of times and it’s always a winner, plus they make great gifts!’  I’ve just made them and eaten one too many, and enjoyed the creamy crunch of the brazil nuts together with the chocolate and hint of cinnamon.  You could try it with other nuts too e.g. pecans (aways great with chocolate) or hazelnuts, and perhaps some chopped raspberries…The recipe is originally by Dan Lepard, who I hear is a bit of a baking king (author of ‘Short and Sweet: The Best of Home Baking’, which I am yet to buy).

I halved the ingredients in the recipe and it made approx 7 normal sized cookies.  They are ready to take out of the oven once they are puffy and smooth and still a bit soft (they keep cooking after they are taken out).  Just remember to keep checking them every couple of minutes once they’re nearly cooked as it’s so easy to overdo them!

Ingredients

125g unsalted butter, softened
225g light soft brown sugar
1 tsp vanilla extract
1 medium egg
25g cocoa
¾ tsp ground cinnamon
175g plain flour
½ tsp bicarbonate of soda
200g milk or dark chocolate, chopped roughly into big chunks
150g brazil nuts, cut into quarters

Put the butter, sugar and vanilla in a bowl and beat until smooth. Beat in the egg, then stir in the cocoa and cinnamon. Add the flour and soda, work until combined, then mix in the chocolate and nuts; I use my hands because I find it easier to scrunch up the dough and get the mixture really even. Pinch off nuggets of dough the size of a ping-pong ball (for regular cookies) or unshelled hazelnut (for mini ones), and roll between your palms until smooth. Cover a baking tray with nonstick paper and place the soon-to-be cookies on it 3-4cm apart. Heat the oven to 180C (160C fan-assisted)/350F/gas mark 4 and bake for eight to 10 minutes (for mini cookies) or 12-14 minutes (for regular ones). Leave to cool on the tray for a few minutes, then transfer to a rack with a spatula. Once cold, store in an airtight container.

Image

Cream of mushroom soup in 25 mins! Plus Jamie Oliver’s new 15 Minute Meals book

Cream of mushroom soup

This soup is reliably tasty and easy to make and works well as a starter, or a main, along with some bread and salad perhaps.  I like the fact it is creamy and smooth but there are juicy chunks of mushroom in it.  Use your own judgement a little with how much milk/stock to add.  If the soup ends up too thin then just boil it down for a bit longer.

Image

Ingredients

275g mushrooms (I used button mushrooms but any type would work)

1 tbsp oil

Very large knob of butter

1 small onion, finely chopped

1 tbsp plain flour

450ml vegetable stock

450ml milk

Salt and pepper

Heat the oil and half the butter in a saucupan and add the onion and three quarters of the mushrooms (including all the mushroom caps).  Fry for a few minutes, stirring frequently, then cover and sweat over a gentle heat for approx 7 minutes, stirring occassionally.  Meanwhile, melt the rest of the butter in another pan and fry the remaining mushrooms for approx 5 mins, until they are slightly soft and tender.

Stir the flour in to the soup mixture and cook for one minute, then gradually add the stock and milk, to make a smooth sauce.  Season to taste.  Bring to the boil and simmer for 15 mins.  Use a food processor/hand-held blender to process the soup until smooth.  Pour the soup in to a clean saucepan and add the remaining fried mushrooms.  Add a swirl of cream and a couple of basil leaves when serving, if you like.

Jamie Oliver’s new book

Image

(Photo from www.gorenjegroup.com)

I’m a bit excited to hear that Jamie Oliver is launching a ’15 Minute Meals’ book in September.  He felt that his 30 Minute Meals book was too complicated so is making his new recipes simpler and even quicker (although based on the fact I didn’t manage to make his 30 minute meals in less than an hour, maybe we should expect to make 15 minute meals in 30 minutes…)  There will be meat, fish and vegetarian dishes from all over the world  and tips on how to get great flavours using less ingredients.  In Jamie’s words – ‘bloody good cooking for busy people.’  I’m all for fast meals!  Here is the link:

http://www.jamieoliver.com/news/15-minute-meals/?utm_source=JO_newsletter&utm_medium=email&utm_campaign=July2012

My veggie lasagne (50 mins prep/50 mins cooking) and the versatility of soy sauce

This lasagne recipe has been evolving for about 15 years.  It started off pretty bland but I think it’s nearly perfected.  The *exciting ingredients* of porcini mushrooms and soy sauce give it a richness that has even fooled meat eaters in to thinking it is not vegetarian…although obviously you could swap the veggie mince for the real stuff if you prefer.  You will need a large pan to make the sauce.  If you have any sauce left over then it goes well with pasta or a jacket potato.  Hope you like it!  My boyfriend reckons it tastes best the following day.  Serves 4 – 6 depending on appetite.

Image

Ingredients

3 tablespoons of olive oil (or enough to keep the veg from cooking and not sticking to the pan)

3 cloves of chopped/crushed garlic

Teaspoon of dried mixed herbs

200g veggie mince

40g dried porcini mushrooms, soaked according to pack instructions and finely chopped

1 red pepper, finely chopped

1 carrot, finely chopped

1 courgette, finely chopped

1 onion, finely chopped

2 tins of chopped tomatoes

Half a tube of tomato puree

2 tablespoons of soy sauce (and possibly more, according to taste!)

2 veggie stock cubes to crumble in

Salt and pepper

(Optional – a big glug of red wine, added at same point as chopped tomatoes)

Very large knob of butter

1 1/2 tablespoons of plain flour

Approx 300ml milk, more if necessary

180g cheddar cheese, grated

Lasagne sheets (enough for 2 layers)

Preheat the oven to gas mark 6 / 190 degrees.  Put the olive oil in a pan and add the crushed garlic and herbs.  Cook for 30 seconds then add the pepper, carrots and veggie mince for a few minutes.  Add the (soaked) mushrooms, onion and courgette, stirring until the vegetables are all starting to soften but still slightly tender (approx 10 – 15 mins, you may need to add more olive oil).  Add the chopped tomatoes, soy sauce, tomato puree and crumbled veggie stock cubes and simmer for another 10 minutes.  Add some water if necessary, or red wine if you prefer, and season to taste with salt and pepper.

Meanwhile make the cheese sauce.  Melt the butter in a saucepan and then add the flour, stirring constantly, so the mixture is thick but not sticking together.  Very gradually add the milk, until the sauce is thick, well combined and easy to stir.  Add 2/3 of the cheese.  Season with a little salt and pepper.

Put half of the vegetable sauce in the bottom of an ovenproof dish and top with the lasagne sheets.  Carefully pour on half of the cheese sauce, so it completely and evenly covers the lasagne sheets.  Pour the remaining half of the vegetable sauce on top, then the remaining lasagne sheets, then the remaining cheese sauce.  Finally top with the grated cheese.

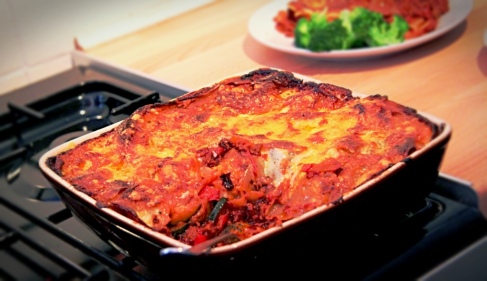
Cook the lasagne for approx 50 mins, until the topping is golden brown and a knife slides very easily in to the lasagne.

Serve with salad.

Soy sauce (an *exciting ingredient*)

Soy sauce does not just work well in oriental style dishes.  It’s great for adding to tomato based sauces/dishes to give the flavour more depth, especially in the absence of meat!

Kids snack – red pepper and cheddar tortillas (8 mins prep/20 mins cooking)

Image

These healthy ‘tortillas’ are basically mini omelettes that you cook in a muffin tray in the oven.  They are super quick to prepare, my kids love them and don’t even question the vegetable content!  They are the perfect snack size and you can freeze some for later if need be.  Cooking time will vary according to your oven.  Just check every few mins from about 15 mins until they are set in the middle and browned on the outside.

You could try lots of different veg ingredients – raw chopped spinach or asparagus, canned sweetcorn or cooked brocolli, carrot or mushrooms.  Olives would be a lovely addition too!

Image

Ingredients (makes approx 10)

1/2 red pepper, finely chopped

1 tbsp cooking oil

6 spring onions, finely chopped

75g cheddar cheese, grated

1/2 teaspoon of smoked paprika (optional but gives them a nice smoky flavour)

6 eggs

100ml milk

Preheat the oven to gas mark 6 / 200 degrees.  Place the pepper and onion in a bowl with the cheese and smoked paprika and mix well.  Whisk together the eggs and milk then add to the mixture.

If you have a decent non-stick muffin tray, rub each hole with a little oil then fill each hole 1/3 full with the mixture.  Alternatively, if you think the mixture will stick to the tray then line each hole with 2 paper muffin cases and fill each case 1/3 full of the mixture.   Bake for 15 mins then check every few mins until the tortillas are visibly set in the middle and golden brown on the outside.

Leave to cool a little then carefully remove (using a spoon if straight from the tray).


Chilli ginger glazed salmon with mango and cucumber salsa (15 mins prep/25 mins cooking)

This is a straightforward and very tasty recipe, bursting with flavour and perfect for the ‘summer’.  The person I ate it with said they liked the combination of the heat of the chilli glaze and the fresh zinginess of the salsa, but I am not allowed to officially quote them as they were too ashamed of having used the word ‘zinginess’..  You can use basmati or brown rice, but I like the nutty texture of brown rice.

Image

Here is the recipe (originally by www.tesco.com/food).  Serves 6:

Ingredients

4cm (1/2 in) piece root ginger, finely grated

2 tbsp soft brown sugar

2 tsp mild chilli powder

2 limes, zested and juiced

6 medium-thick salmon fillets

brown or basmati rice and plain/greek yoghurt to serve

For the relish

1 large mango, peeled and diced

1 small cucumber, finely diced

1 small red onion, finely diced

handful of mint, chopped

In a bowl mix the ginger, sugar, chilli powder, lime zest and half the lime juice.  Season to taste.  Put the salmon fillets in the marinade, turning to coat, and set aside.

Preheat the oven to gas mark 7 / 220 degrees.  Mix the relish ingredients with the remaining lime juice.  Season with a little salt and set aside.  Put the marinated salmon on a tray and cook in the oven for around 25 mins, until the top is sticky and a little browned and the rest is flaky.  Meanwhile cook the rice.  Serve the salmon on top of the rice, and top with the relish, with the yoghurt on the side.

Vanilla panna cotta with raspberry sauce (20 mins prep plus 1+ hour for panna cotta to set)

I wanted to do a blog about homemade ice lollies, but given the rubbish weather thought that was a bit pointless…  So instead I have opted for vanilla panna cotta with raspberry sauce, which still feels quite summery but also creamy enough to cheer up a rainy day/evening.  It’s the first time I’ve made it and yes – it is as quick and easy as the recipes claim!   You need ramekins for each serving.  I used vanilla essence instead of a vanilla pod as they were very expensive.  My friend used Dr Oetker Vege-gel (which she bought in Sainsbury’s) instead of gelatine and this worked fine apparently.  Recipe serves 5.

Image

Here is my slightly simplified version of the recipe (originally from http://www.bbc.co.uk/food/recipes/vanillapannacotta_87907/ ):

Ingredients

For the panna cotta

3 gelatine leaves

250ml/9fl oz milk

250ml/9fl oz double cream

1 teaspoon of vanilla essence or 1 vanilla pod, split sideways, seeds scraped out

25g/1oz sugar

For the sauce

175g/6oz sugar

175ml/6fl oz water

350g/12oz raspberries

For the panna cotta, soak the gelatine leaves in a little cold water until soft.  Place the milk, cream, vanilla essence/vanilla pod and seeds and sugar into a pan and bring to a simmer. If using a vanilla pod, discard at this point.  Squeeze the water out of the gelatine leaves, then add to the pan and take off the heat. Stir until the gelatine has dissolved.  Divide the mixture among four ramekins and leave to cool. Place into the fridge for at least an hour, until set.

For the sauce, place the sugar and water into a pan and bring to the boil. Reduce the heat and simmer until the sugar has dissolved.  Take the pan off the heat and add half the raspberries. Using a hand blender, blend the sauce until smooth.

To serve, turn each panna cotta out onto a serving plate, by dipping the base of each ramekin in boiled water, gently sliding a knife around each of the panna cotta and turning it out in to the centre of the serving plate. Spoon over the sauce and garnish with a sprig of mint if you fancy.

Here is a link to some more adventurous panna cotta recipes

http://www.bbc.co.uk/food/recipes/search?dishes[]=panna_cotta   I think I’ll give the lemongrass and coconut panna cotta a try sometime soon!

Introducing Tess and her carrot and sesame burgers

Image

Tess is a 9 year old budding cook and my junior blogger.  Tess says: ‘This is a a burger full of deliciousness and I’ve made it three times. Our family ate it tonight and we all liked it because its vegetarian and full of flavour. It’s healthy and very carroty and I think the yoghurt makes a big difference and so do the sesame seeds. I definately recommend rocket in the burger because it makes it crunchy and peppery, but not if if you don’t like it.’

Tess’s mum says: ‘If you have loads of carrots this is a great way of using them up. But there’s lots of grating involved (unless you have one of those whizzy machines) and you’ll need a decent/large-ish food mixer to make your life easy. You could add another egg into the burger mixture for binding it if you like.’

Image

Here is the recipe (originally from www.bbcgoodfood.com).  Serves 6:

Burger:

750g carrots, peeled and grated

1 large can of chickpeas, drained and rinsed

1 small onion

2 tbsp tahini paste

1 tsp ground cumin

1 egg

100g breadcrumbs

zest of one lemon

3 tbsp sesame seeds

3 tbsp olive oil

Lemon dressing:

at least half a large pot of natural yogurt

juice of half a lemon

1 desert spoon of tahini

And finally:

6 wholemeal buns

rocket leaves

avocado

sliced red onion

Optional – chilli sauce to serve

Put a third of the grated carrot in the food processor with the chickpeas, onion, 2 tbsp tahini, cumin and egg. Whizz to a thick paste and scrape into a large bowl.  Heat 1 tbsp oil in a big frying pan, tip in the remanning two thirds of grated carrot and cook for 8-10 mins stirring all the while until the carrot is softened (it will turn a little more golden in colour).  Add the cooked carrot to the whizzed up paste of carrots, add breadcrumbs, lemon zest and sesame seeds. Add seasoning and mix together well with your hands.

Make the lemony dressing by mixing the yogurt, tahini and lemon juice.

Divide the burger mixture in to 6 balls using wet hands and shape into burgers. Heat a non stick frying pan and brush burgers with remaining oil on both sides. Cook burgers for 5 mins on each side until golden and crisp. Meanwhile half the buns lengthways and warm. Add a burger to each bun and lather with lemony dressing (the more the better!)  Add rocket leaves, some red onion slices and slices of avocado and finish with a drizzle of chilli sauce if you like it and have some in.

Image

Enjoy!

Tess will be a regular contributor to the blog and next plans to write about easy recipes for children to cook, including popcorn topping and her very own dessert recipe!

Seriously good leek and cheese toasties

This may not sound very sophisticated but it is SO good!  There’s something about leek, cream and cheese which is a bit special, especially when it tops a couple of pieces of crunchy toasted bread.  And it only takes about 15 minutes.  It’s very rich so serving it with some steamed, buttered asparagus should fill you up plenty.  Recipe courtesy of Hugh Fearnley-Whittingstall.

Image

(Photo from www.wildinthekitchen.wordpress.com)

Ingredients

15g butter
2 leeks, trimmed (white and pale green part only), washed and sliced
A sprinkling of dried mixed herbs
3 tbsp double cream or crème fraîche
50g mature cheddar or other well-flavoured hard cheese, grated
Sea salt and freshly ground pepper
2 thick slices good, robust bread

Melt the butter in a frying pan over medium heat and add the leeks. As soon as they are sizzling, turn down the heat and sweat gently, stirring, for 8 minutes. Stir in the herbs and cream (or crème fraîche), and cook for a minute or two, until the cream is bubbling. Take off the heat and stir in two-thirds of the cheese. Season to taste. Lightly toast the bread, spread on a thick layer of the leek mixture and top with the remaining cheese. Grill until bubbling and golden. Serve straight away.